New dam for our pond
 The pond in 2005 with the dam on the right. The windmill aerates the water by pumping air through a bubbler in the middle of the pond. Aeration improves water quality and reduces sedimentation — but also, we do like the looks of the windmill! |
Our original dam was made from cedar and treated railway ties. We had installed it in a trench, and filled the inside with rocky rubble before building up the sides with clay. The water went over a weir and we could adjust the pond level by adding or removing boards. It looked nice, and the water falling over the weir sounded nice, but the design had a couple of flaws.
First, muskrats dug into the banks and water made its way through their holes in the spring. To discourage their digging, I laid old chain link fencing along the pond embankment and covered it with gravel. This helped, but they still dug from the creek side.
More importantly though, each winter the frost would make its way in amongst the rocks and rubble in the dam. The freeze and thaw cycle let more water in and each winter we could see that the pond level was falling below the outlet level as it made its way through new channels created by the frost. As the ground thawed, most channels would fill in and the dam was more or less impervious again. However, the frost was lifting the whole dam assembly, and by 2006 it was a full 14" above its original level! (We used to be able to put two 2x6 and one 2x4 barriers in the weir; now no barriers are required.)
I knew I'd need to address this sooner or later, but the real impetus came with our decision to replace our old oil furnace with a geothermal heat pump (GHP) in March of 2006. To provide heating and hot water, a GHP extracts heat from a ground or water source; in the summer, it reverses to "dump" heat extracted from within the house. The ground source can be from tubes drilled into the ground or from a source of water like a pond or a stream. In our case, the pond was a good candidate, but only if we could deepen it a bit more and ensure that the level didn't drop during the winter.
The GHP was installed in late March and ran with its electric backup until the ground thawed and we could install the thermal loops. Our electrical consumption in April will be high, but we didn't use any oil except for hot water. Unfortunately, May was unusually wet so we were delayed in rectifying the dam situation.
The images on this page show some of the process. I'll update this as we proceed! (The thumbnails are linked to a larger version of the image when clicked.)
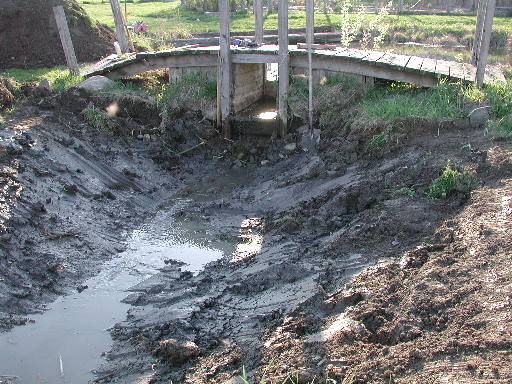 Getting started.
After the backhoe scraped off the surface cover for the new dam site, we dug a deeper plug 4' wide across the creek in the middle of this area (into almost dry blue clay) and filled it with tamped clay loam to act as an impermeable layer.
(This info came from a USDA publication on building ponds.)
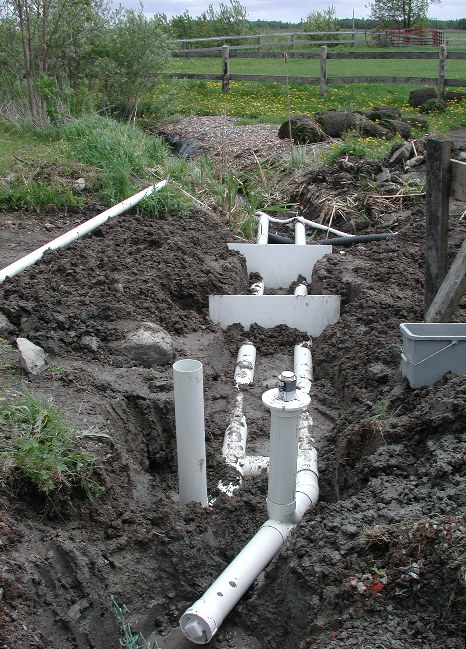 I used 4" sewer pipe fittings to prepare the drain assembly. This
view is from the upstream end, where the two vertical columns will eventually
be the intakes.
I used 4" sewer pipe fittings to prepare the drain assembly. This
view is from the upstream end, where the two vertical columns will eventually
be the intakes.
I'll cut these so I can slide different lengths on to get different water depths. The extension with the screw-in cap will be enable me to lower the level quite substantially when I need to, but also lets me keep the level low while we build the dam. The white panels partway along are anti-seep barriers to stop water from following along the tubes.
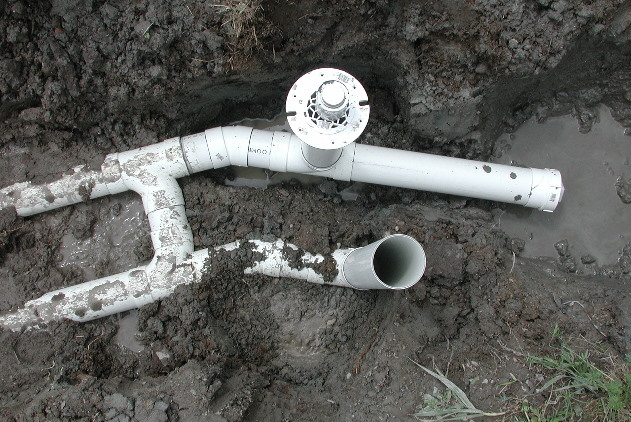 This shows how the intake is assembled. I used two tubes
to get more capacity (in case of heavy flow) but also for stability since
the joined tubes are less likely to tilt.
This shows how the intake is assembled. I used two tubes
to get more capacity (in case of heavy flow) but also for stability since
the joined tubes are less likely to tilt.
The two tubes are joined with "wye" fittings, which made it sturdy enough to carry the whole assembly to the site to install it.
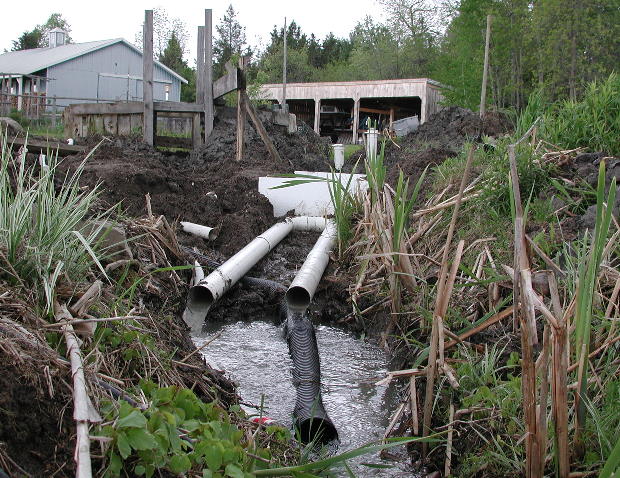
 First water flowing through!
The drain is open and I've cut through the old dam to allow water to flow into the catchment basin. It didn't take long for it to clear up and the pond level went down almost 10" by the next morning.
When the dam is complete, the tubes will be within the pond, and I'll cut a plastic barrel to protect the intake and enable me to cover it for winter protection. The flow and heat within the water will keep it from freezing, but covering it will help keep ice from forming too.
 This
is looking upstream at the outlets.
This
is looking upstream at the outlets.
The black tile in the creek is the temporary siphon I used to get water past the excavated area while I installed the tube assembly.
The dam will be almost 20' wide at the base, and I'll lay flat stones at the outlet to reduce erosion.
Home -- Random image gallery -- Here --